Overview #
SOPs (Standard Operating Procedures) are used to define structured instructions for performing tasks in a consistent and standardized way. They help guide users through processes using step-by-step instructions, images, videos, or documents.
SOPs are useful for training, onboarding, maintenance procedures, and ensuring operational consistency across teams.
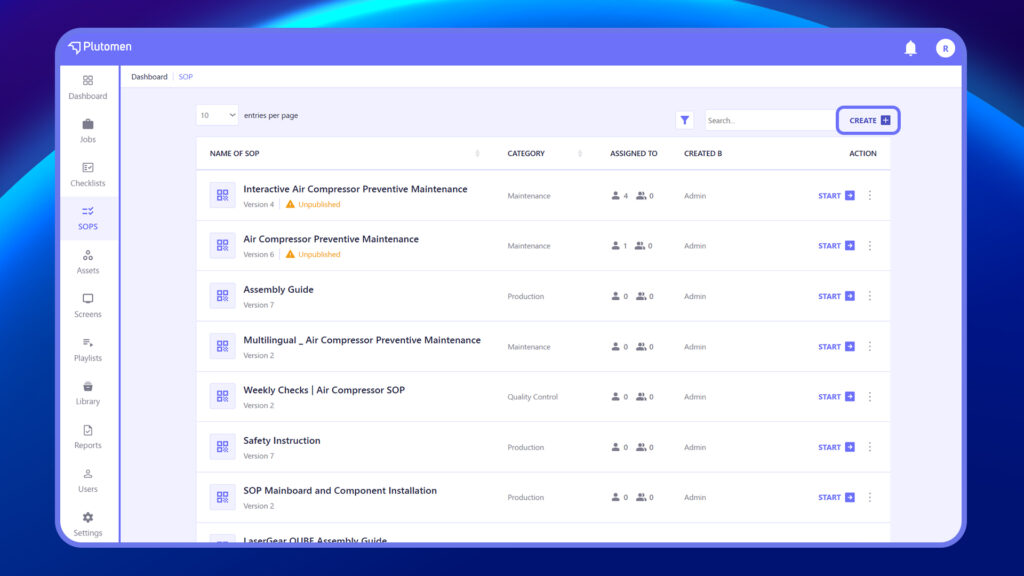
How to Create a SOP #
- Log in to the Admin Panel web page.
- Select “SOP” from the menu on the left-hand side.
3. Click on “+ Create SOP” in the upper-right corner of the SOP section.
4. Click on the “Edit” option at the top left to add SOP details.
5. Clicking on “Edit” opens a modal window titled “SOP Details.”
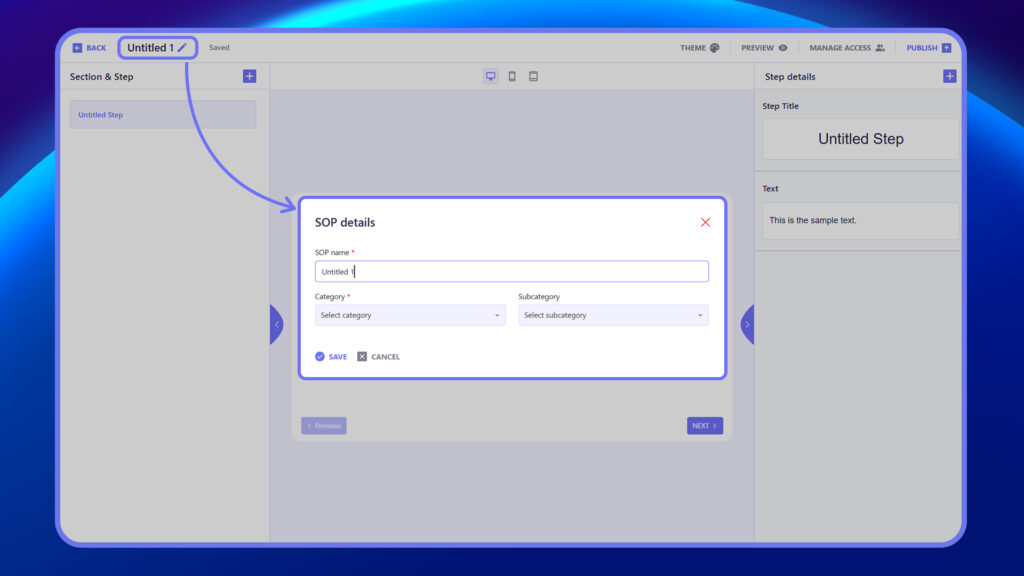
6. Add a title to the SOP and categorize it in a category and sub-category.
7. Once saved, this title becomes the title for the SOP.
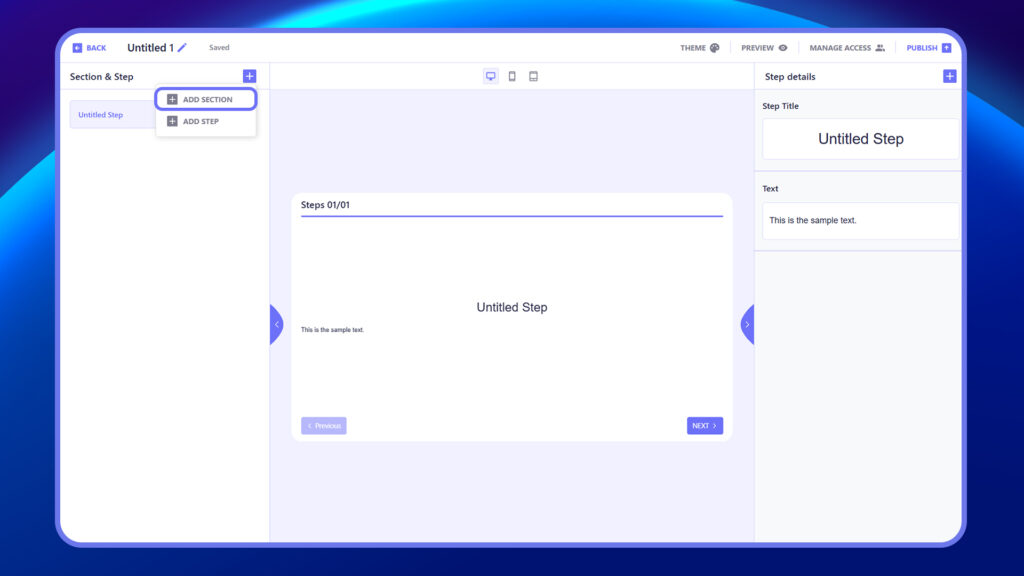
8. Click on ‘+ Add Section’ from the Section and Step navigation panel on the left.

9. A new section will be added within the navigation panel, with an option to add a heading in the SOP section.
10. Adding the heading will reflect in real-time on the navigation panel as well.
11. Click on ‘+ Add Step’ from the Section and Step navigation panel on the left.

12. A new step will be added within the navigation panel, with an option to add content component details within the step.
13. For each step:
- Enter the Step Title.
- Provide clear Instructional Text.
- (Optional) Add Images or Videos for visual guidance.
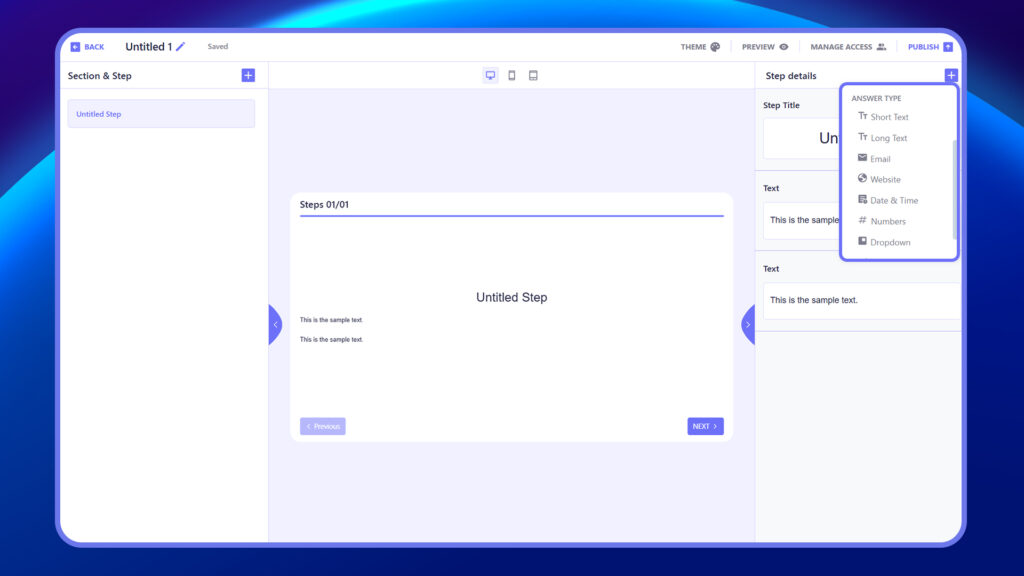
- Select an Answer Type (e.g., Short Text, Long Text, Email, Link, Date & Time, Number, Dropdown, Multiple Choice).
14. Repeat to add more steps and sections as needed.
15. Click Save or Publish to finalize the SOP.
How to Organize SOP Using Sections or Pages for Better Structure #
Organize your SOP by adding sections that group related instructions. Within each section, you can create steps with specific titles and descriptive content to guide users through the procedure.
- Click the “+” sign in the SOP section.
- Choose either:
- Add Section – to group related steps
- Add Step – to insert a new instruction
Step Details #
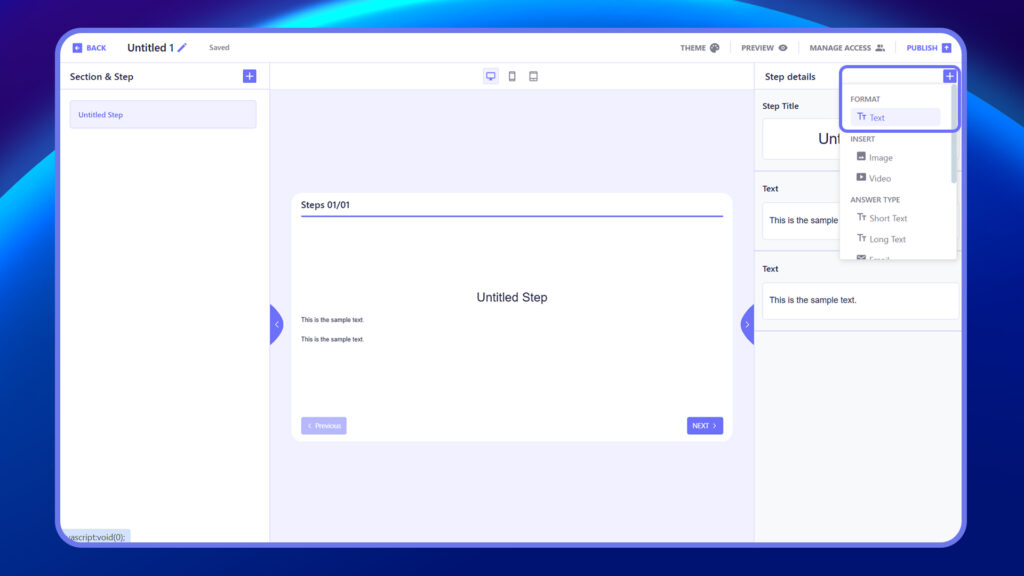
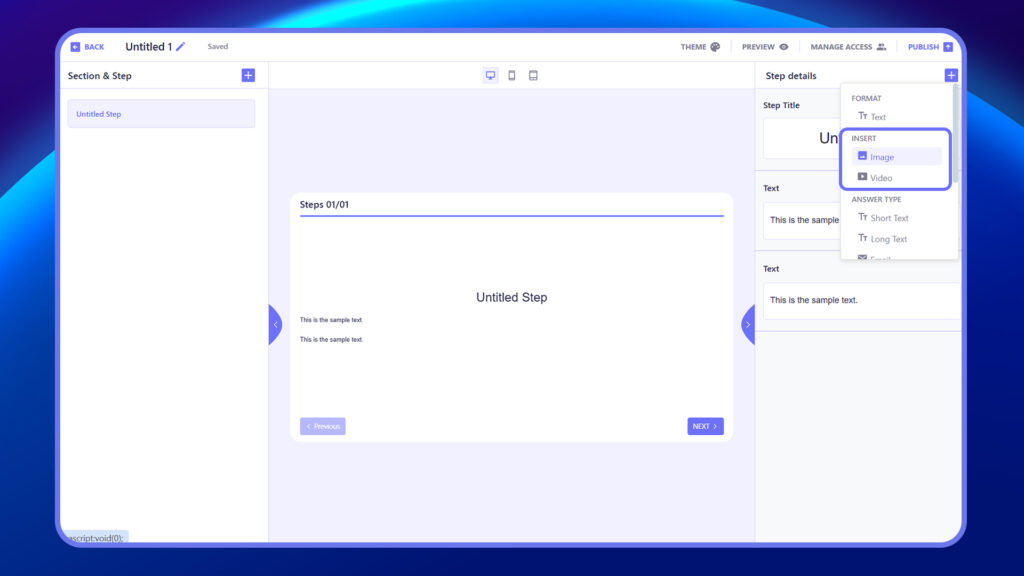
In the Step Details section, you define the content and format of each individual SOP step. Start by entering the step title and instructional text to describe the action or task. You can enhance the step using the Insert options, which allow you to include images or videos for better clarity and visual guidance. To collect user input or responses, choose an appropriate Answer Type. Available answer types include Short Text, Long Text, Email, Website, Date & Time, Numbers, Dropdown, Multiple Choice, and Checkbox. Selecting the right format ensures that each step is both informative and interactive, guiding users effectively through the SOP process.
Steps to Configure Step Details in SOP
- Enter the Step Title to define the task.

2. Add Instructional Text describing the action clearly.

3. Use Insert Options to add Images or Videos for visual support.

4. Select an appropriate Answer Type from the list:
- Short Text, Long Text, Email, Website,
- Date & Time, Numbers, Dropdown,
- Multiple Choice, Checkbox.

5. Click Save to apply the step.
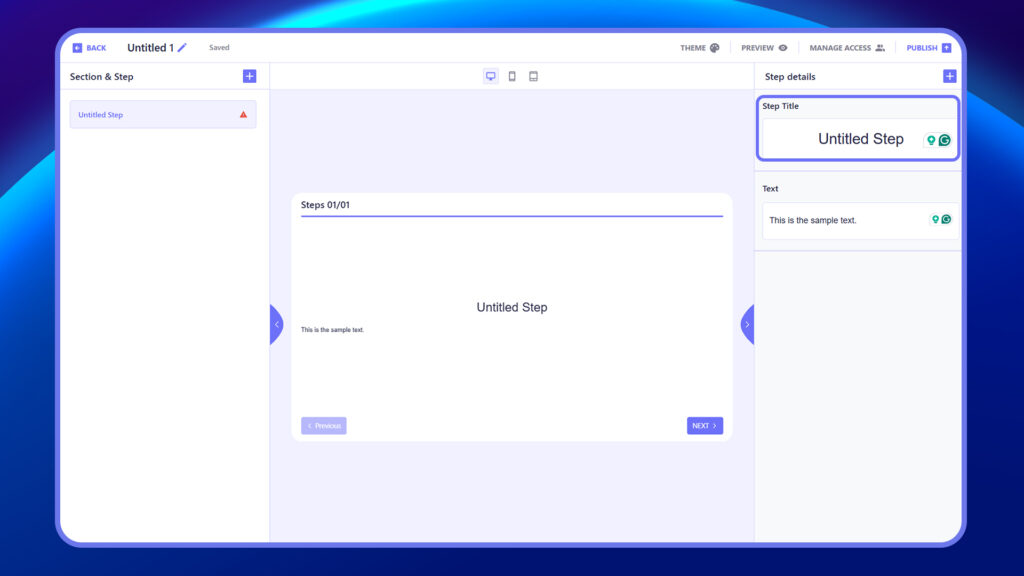
Step Editor Layout #
In the SOP Step Editor, the interface is divided into two main sections. On the left side, users can view and manage the overall structure of the SOP, including the sections and steps that have been created. Each step shows its title and can be reordered, duplicated, moved, or deleted using the corresponding icons. On the right side, users can define the step content, including a Step Title and Text instructions. Below the text area, users can insert additional content, such as images and videos, to support the instruction. This layout allows you to easily navigate between steps on the left while customizing the content for each step on the right.
SOP Editor Layout
- Left Panel – View and manage SOP structure (Sections & Steps).
- + Add Section / + Add Step – Add new sections or steps.
- Right Panel – Edit selected step: title, text, images, and videos.
Responsive Layout #
The SOP editor is fully responsive and works across desktop, tablet, and mobile devices. On a desktop, it shows a split view with steps on the left and editing tools on the right. On tablet and mobile, the layout adjusts for smaller screens—panels stack or toggle for easy navigation. This ensures smooth SOP creation and editing on any device.

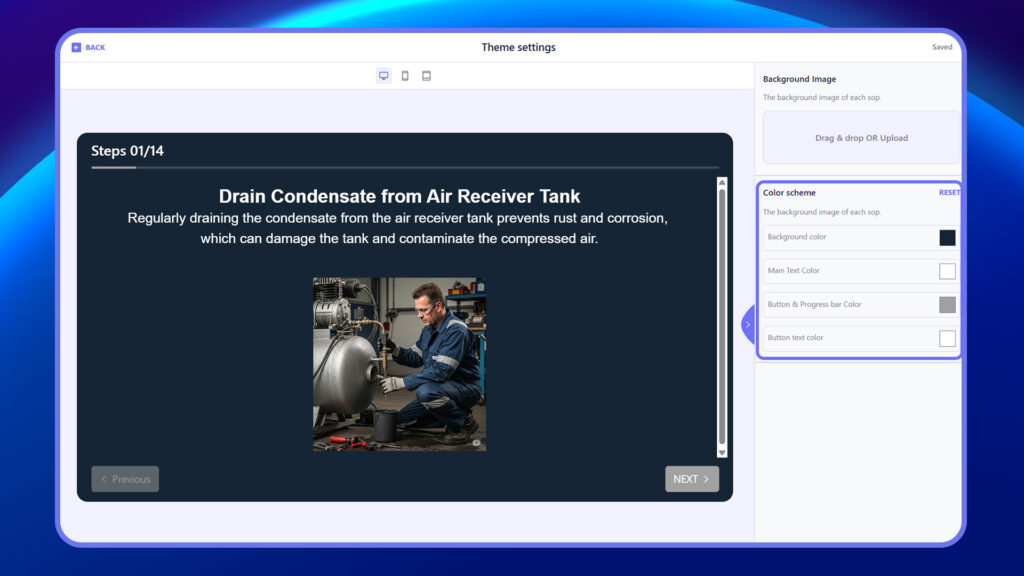
Theme Settings #
The Theme Settings allow you to customize the visual appearance of each SOP. You can upload a background image by dragging and dropping a file or selecting one from your device. Additionally, you can set the background color, main text color, button & progress bar color, and button text color to match your brand or improve readability. These visual elements help create a consistent and user-friendly experience for SOP viewers.
Theme Options
- Background Image: Upload a background image that appears behind the entire SOP content.
- Drag & Drop or Click to Upload from your device.
- Background Color Sets the background color for the SOP, either behind or instead of the background image.
- Main Text Color Defines the color of the primary instructional text to ensure clear contrast and legibility.
- Button & Progress Bar Color Customize the color of:
- Navigation buttons (e.g., “Next”, “Back”)
- Progress bar that shows completion status
- Button Text Color Sets the color of the text inside buttons to ensure it stands out and is readable.
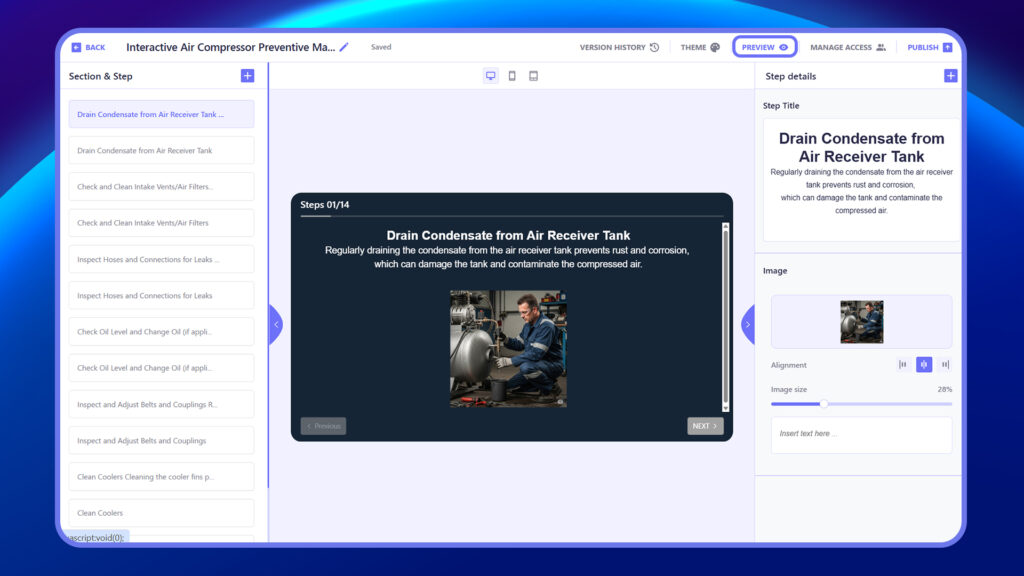
Preview #
The Preview feature lets you view the SOP as an end user would see it. This helps you check layout, content flow, and formatting before publishing.
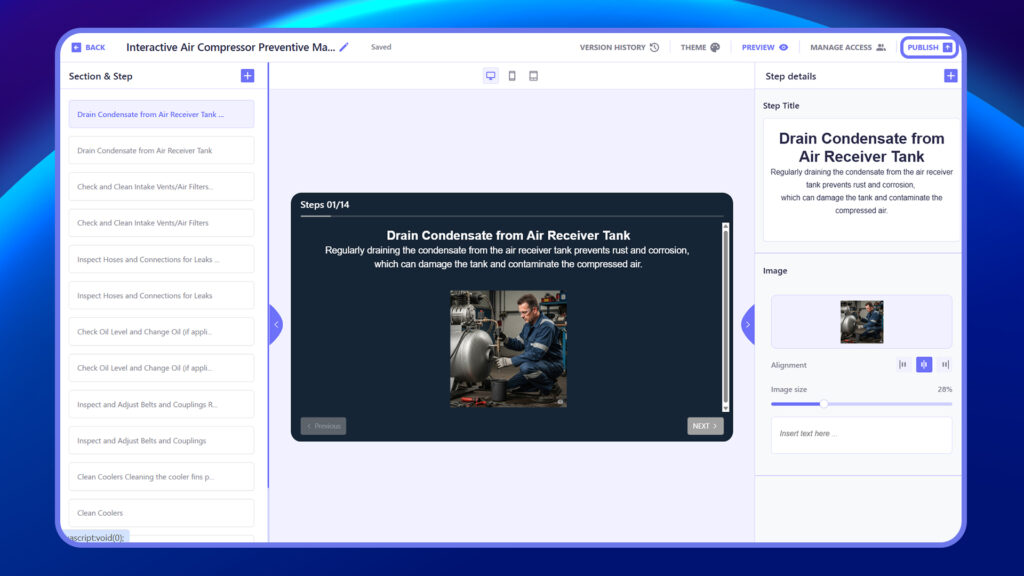
Publish SOP #
Once all sections and steps are completed and reviewed, use the Publish option to make the SOP live. Publishing makes the SOP visible and accessible to assigned users, marking it as the official version in use.
How to Publish an SOP #
- Finish your SOP – Add all sections, steps, and content.
- Review everything – Check text, media, and theme settings.
- Click “Publish” – Located at the top-right of the editor.
- SOP is live – It’s now visible to assigned users.
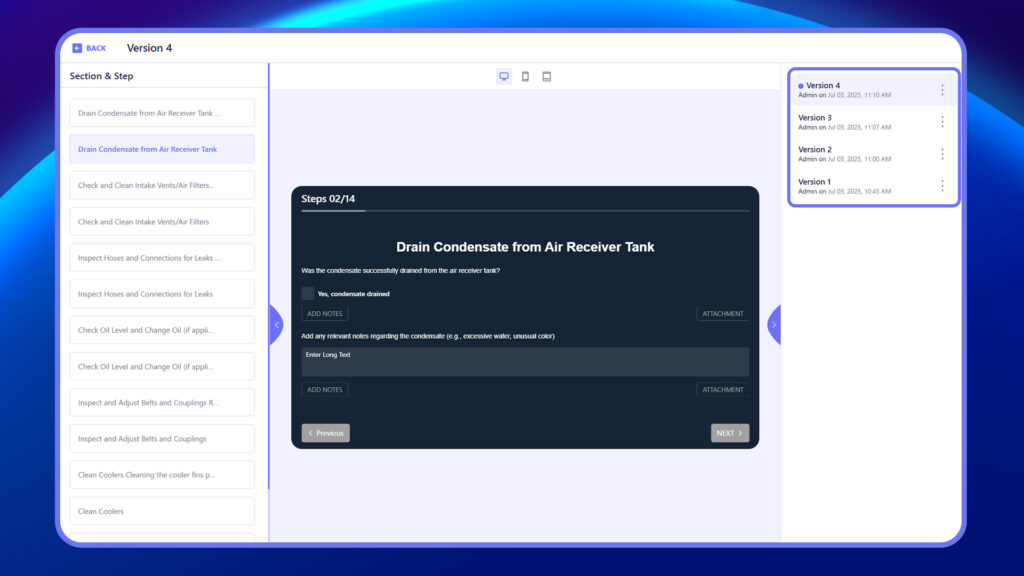
Version History #
The Version History feature tracks all changes made to the SOP over time. Each version is saved automatically, allowing you to view, compare, or revert to a previous version if needed. This ensures accountability and helps maintain a clear record of updates.
Restore SOP from Version History #
- Click “Version History” in the SOP editor.
- Select a previous version to preview.
- Click “Restore” on the version you want.
- Confirm the restore action.
- Edit or republish if needed.
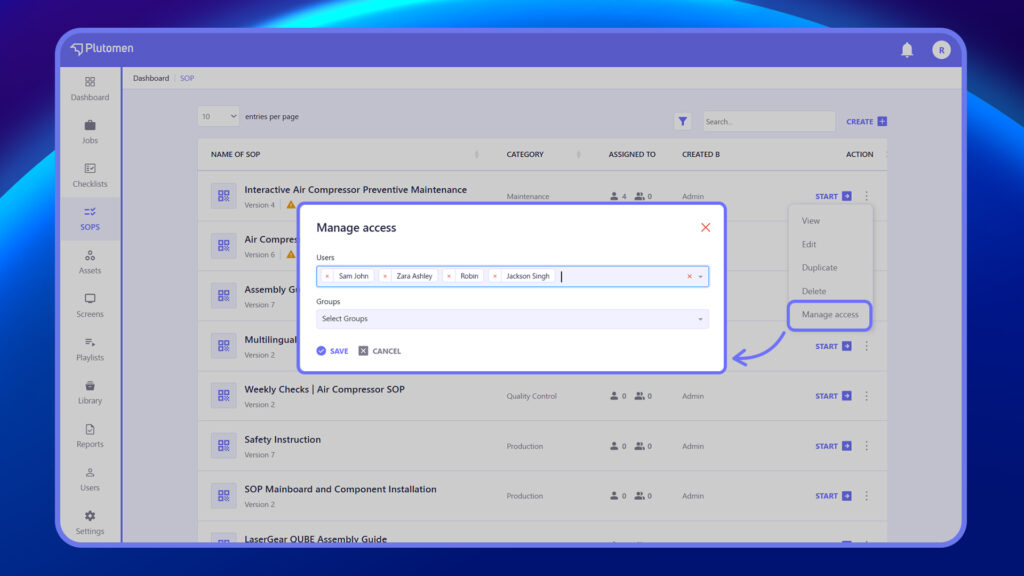
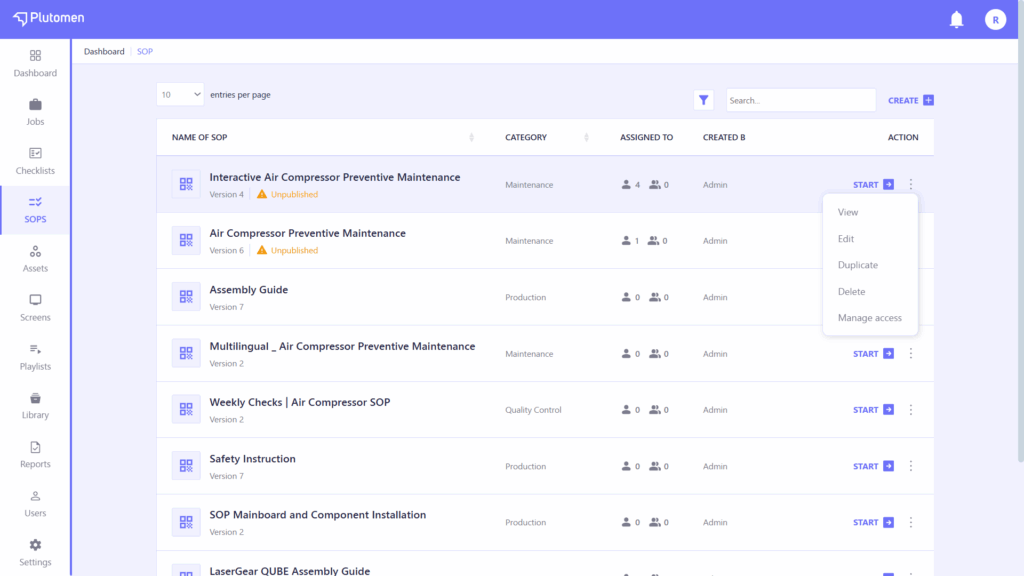
How to Manage Access and Assign SOP to Users or Teams #
- In the SOP list, click the three dots (⋯) next to the SOP title.
- Select “Manage Access” from the dropdown menu.
- In the Users section, add or remove individual users.
- In the Groups section, select or deselect groups to control group-level access.
- Changes are saved automatically or with a Save button.
How to Edit or Update an Existing SOP #
- Find the SOP you want to edit in the SOP list.
- Click the three dots (⋯) next to the SOP title.
- Select “Edit” from the dropdown menu.
- The SOP will open in the editor for you to make changes.
How to Delete an SOP #
- Find the SOP you want to delete in the list.
- Click the three dots (⋯) next to its title.
- Select “Delete” from the dropdown menu.
- Confirm the deletion when prompted
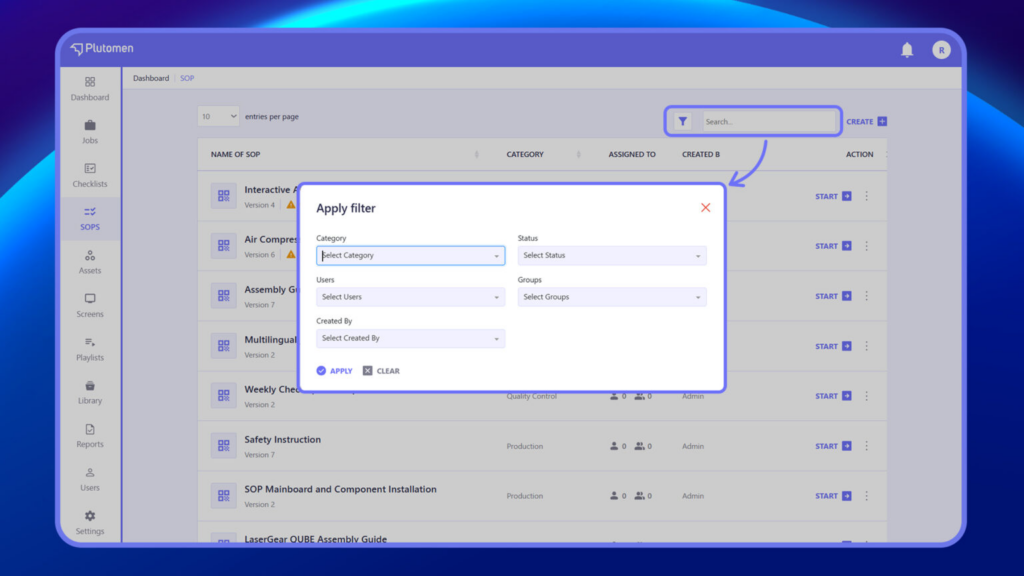
Filter SOP #
- Click “Apply Filter” or open the filter panel in the SOP list view.
- Select one or more filter criteria:
- Category – Choose a specific SOP category.
- Status – Filter by status (e.g., Draft, Published).
- Users – Show SOPs assigned to selected users.
- Groups – Show SOPs assigned to selected groups.
- Created By – Filter SOPs by their creator.
- The list updates automatically or click “Apply” to view results.